Campaigns
Campaigns
What is it used for (purpose)?
Campaigns ties together the various parts that make up the campaign dashboards and campaign Power BI reports.
What is on this page?
The Campaigns tab displays a list of all available campaigns with their Campaign Manager Name, Client, Data Set and Campaign Status.
Actions you can take:
- Search
- Count
- Refresh
- Add Button (to add a new campaign)
- Sort Options default option is Name (Displays Campaigns sorted by client, data set and campaign manager)
Navigation (How do I get to Campaigns?)
There are two ways to navigate to this page:
In the Home page
- Click ‘Campaign Manager’ on the Frequently Used Apps or Available Apps
- By default, you will be taken to the Campaigns Page.
Using the Navigation bar.
- Click ‘Apps’ button on the top right corner of the Navigation bar, and see all available apps
- Click on the ‘Campaign Manager’ App
- By default, you will be taken to the Campaigns Page.
How do you use the functionality in this page?
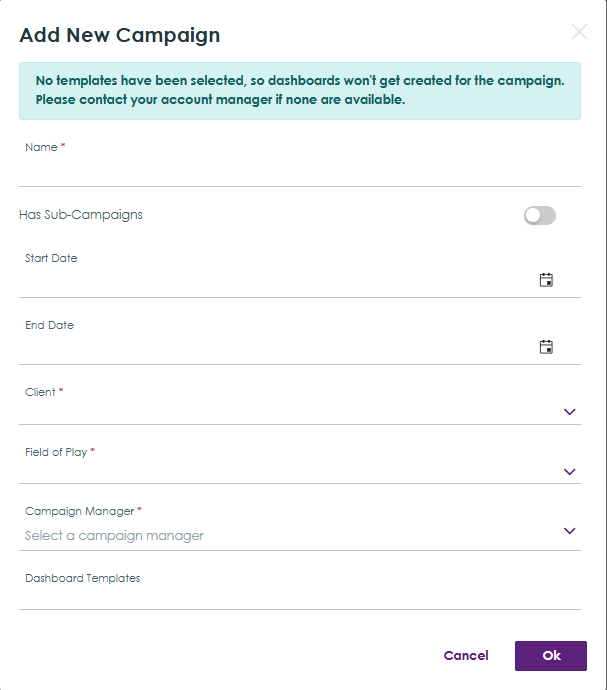
Add a New Campaign
In the Campaign Manager App, select Campaigns in the navigation menu at the top of the page. When a client is selected, a campaign can be created from the Campaigns tab. Click the "Add" button in the top right corner to add a New Campaign, this will display a dialog box.
Help content
Fields to populate:
Name - Type the name of your campaign
Has Sub-Campaigns - Enable if you plan to use the funnel report with breakdown by budget and benchmarks for each sub campaign
Start Date - Date when the campaign must begin
End Date - Date when the campaign must be complete
Client - Select the client = tenant the campaign is for
Field of Play - Select relevant option for the campaign
Campaign Manager - Select the relevant user
Dashboard Templates - Select the relevant dashboard templates (these will be created automatically for the campaign once selected and saved)
Click Ok
By default you are on the Campaign Detail page and to the right there is a collapsible menu with these items
- Campaign Detail
- Sub-Campaigns
- Information
- Security
- Linked Processes
- Reporting
- Glossary
- Target Segment
- Funnel Stage
- Benchmark
- Publishers
- Data Sources
- Dashboards
- Budget
Campaign Detail
Displays all the campaign details fields.
Name of the campaign & Campaign Manager fields are populated as per the dialog box for 'Add New Campaign'.
Other fields on the Campaign detail page:
- Client Campaign Name
- Description
- Start date (date will roll up from sub-campaigns)
- End date (date will roll up from sub-campaigns)
- Campaign Manager
- Fiscal Period
- Campaign Briefing Document (URL)
- Status
- Toggle for Enable Budget Detail Configuration
- Inquiry Process Definition
- Select the digital process used for the client
- If a selected Inquiry Process Definition is removed or changed a warning will display:
- Changing this selection will, after saving, remove existing budget values from the budget table and clear existing analytics field mappings. Consider saving only after you have reviewed and reconfigured the mappings for the new process.
- If Analytics Field mapping section is not populated yet, this warning will display:
- Changing this selection will, after saving, remove existing budget values from the budget table.
- Inquiry Source Field
- Select SourceType for digital processes
- Inquiry Region Field
- Select Region - all budget breakdown will apply to values in this field. Standard options are NALA, EMEA & APAC
- Campaign Selection Field
- Select CampaignName as this is the field in which data for the linked campaign is supplied by publishers
- Validators Task Definition
- Select 1. Validate as this is the task where validation of inquiries occurs
- Validators Group
- Should load automatically, if not, select Digital Validation as this is the role to which all validators are added so that they can access inquiries to validate.
- Media Buyer(s)
- Select users from the Media Buyers group who are responsible for campaigns for the client
- Media Buyers can only be added directly to a campaign if sub campaigns are not enabled
- Where sub campaigns are enabled, Media Buyer is added at sub campaign level and information travels to the campaign (parent) and is read-only.
- Analytics Field Mapping
- The listed fields are all related to validation outcome
- Source fields (from Inquiry process definition) can be mapped to analytics fields / target fields which are:
- Campaign with Source field = CampaignName, both Text and Lookup are supported (this is because digital processes are not linked to Campaign from Campaign Manager)
- Publisher with Source field = PubilsherId, both Text and Lookup are supported (this is because digital processes can have a client facing column and also Publisher from Campaign Manager)
- Validation Outcome (InValidINQ) with Source field = IsValidINQ, both BOOLEAN and compatible lookup are supported (this is because most digital processes use lookups NOT Boolean)
- What you must know: When Campaign Manager maps Validation Outcome to a lookup/options field and the selected option carries a machine-readable value of true, the corresponding Analytics DB value is recorded as true
- Examples of incompatible lookup fields:
- Incorrect value - Anything other than value true/false e.g. pass/fail
- Less than 2 items e.g. only a true value
- Less than 3 items e.g. true, false and false values
- Options fields with 'Items have values' DISABLED
- QA Status with Source field = QAStatus, both BOOLEAN and compatible lookup are supported (this is because most digital processes use lookups NOT Boolean)
- What you must know: When Campaign Manager maps QA Status to a lookup/options field and the selected option carries a machine-readable value of true, the corresponding Analytics DB value is recorded as true
- Examples of incompatible lookup fields:
- Incorrect value - Anything other than value true/false e.g. pass/fail
- Less than 2 items e.g. only a true value
- Less than 3 items e.g. true, false and false values
- Options fields with 'Items have values' DISABLED
- Rejection Reason with Source field = ReasonForDisqualificationCS
- Region with Source field = Region
- Source with Source field = SourceType
- First Name with Source field = FirstName
- Last Name with Source field = LastName
- Job Title with Source field = JobTitle
- Company Name with Source field =CompanyName
- Email with Source field = Email
- Phone with Source field = PhoneNumber
- Country with Source field = Country, both Text and Lookup are supported (most digital processes have lookup)
- Digital Unique ID with Source field =DigitalUniqueId
- Once configured this mapping carries over to all sub campaigns associated with the parent campaign
- Analytics Field Mappings are cleared if the linked Inquiry process definition is changed
- Client instructions
- Any information added in this field is visible in the 'Other Resources' tile of the client facing dashboard
- In general contact details of Account Manager & Campaign Manager are listed
- Internal instructions.
- Any information added in this field is visible in the 'Other Resources' tile of the internal dashboard
- In general training content for digital is made available
- Any client specific training content can also be added
Sub-Campaigns
Displays all sub-campaigns linked to the campaign with respective Start Date & End Date
How to configure Sub-Campaigns
Add a sub-campaign by clicking on the Add button. A dialog box will appear where you must populate Name, Start Date and End Date.
All sub-campaigns are visible in the menu item = Sub Campaigns
When you select a sub-campaign, the Sub-Campaign Detail page will be visible on the right pane.
A collapsible menu is also visible in the far right and contains these items:
- Detail (links to Sub-Campaign Detail page)
- Linked Processes
- Target Segment
- Benchmark
- Publishers(Cost per lead)
- Dashboards
In the Sub-Campaign Detail page you will see all the campaign details fields.
Name of the campaign, Start Date & End Date fields are populated as per the dialog box for 'Add Sub Campaign'.
Other fields on the Sub-Campaign Campaign detail page:
- Client Campaign Name
- Description
- Start date (populated)
- End date (populated)
- Campaign Manager (carried over from the parent campaign)
- Fiscal Period
- Campaign Briefing Document (URL)
- Status
- Toggle for Enable Budget Detail Configuration
- Inquiry Process Definition (selected process carried over from the parent campaign)
- Inquiry Source Field (value carried over from the parent campaign)
- Inquiry Region Field (value carried over from the parent campaign)
- Campaign Selection Field (value carried over from the parent campaign)
- Validators Task Definition (value carried over from the parent campaign)
- Validators Group (value carried over from the parent campaign)
- Media Buyer(s)
- Select users from the Media Buyers group who are responsible for campaigns for the client
- Media Buyers information travels to the campaign (parent) and is read-only at parent level
- Analytics Field Mapping (settings carried over from the parent campaign)
- Client instructions (settings carried over from the parent campaign)
- Internal instructions (settings carried over from the parent campaign)
Items which must be configured for each sub campaign for the dashboard (accessible in the collapsible menu bar):
Linked Processes
Benchmark
Publishers
Dashboard (settings carried over from the parent campaign)
Information
See created by, created date, updated by and Updated date.
Security
Allows you to define permission for users to create, read, update and delete of the Campaign. You must add the users which are permitted to take actions.
Actions you can take (Campaign Security page):
- Search- you can search for the users that were given access to the campaign.
- Add a user or group by clicking on the ‘Add’ button. A dialog box will appear. There are 2 options to choose from
- User-adding security permission to a user.
- User Group-adding security permission for a user group.
- Refresh- You can refresh the Users/Group list
Linked Processes
Displays all the processes linked to a Campaign.
- Actions you can take (Campaign Linked Processes):
Add Available Process by clicking Add available process button. Add available process dialog box opens and you can choose the linked process type (CRM Activity, Overview OR Diagram) and select a process design and click add. - Changing the selected linked process will remove existing budget values from the budget table (only upon save) and clear existing analytics field mappings. Consider saving only after you have reviewed and reconfigured the mappings for the new process, and then you can add budget information again.
Reporting
Displays the list of reports added to the campaign, showing the report name and type
Actions you can take (Campaign Reporting):
-
Click Add (top left), to add a report. A dialog box will require you to type the name of the report, then and choose whether to upload a new report or use an existing report. click ’Ok’ to save (or cancel if you do not wish to proceed).
-
Uploading a New Report: Select the Upload New Report option and click Next, enter the report name, select the report workspace and report type from the dropdown menus, then click Browse File to choose the report you want to upload.
-
Use Existing Report- Select Use the existing report option and click Next, enter the report name, report workspace, report type and select a report and click add a report.
-
On the far right, hovering over the ellipsis reveals an Edit option and Delete option, the edit option opens the Edit Report dialog where you can update the report name, select a different report type, and click Save to apply the changes. When you click the delete option a delete report dialog box will open and click ok if you want to delete the report
Glossary
Glossary is reference list of standard terms and definitions used in a campaign, so everyone understands the same meaning.
Glossary displays the list of added glossary with their Order, Team, Metric, Description, Measure and TCR.
Actions you can take (Campaign Glossary):
- A New Campaign Glossary item can be added by Clicking the "Add" button in the Middle pane, this will display a dialog box with 5 fields:
- Term (Required)- The Name given to the glossary
- Metric (Required)- This is a measurable number used to track and evaluate performance of the campaign
- Description (Required)-The description added to the Glossary
Measure-The measure is a number used to count results in a campaign - Target Conversation rate- Is the conversation rate you aim to achieve
- On the far right, hovering over the ellipsis reveals an Edit option and Delete option, the edit option opens the Edit Item dialog where you can update the Term, Metric, Description click save item and all the items are saved. When you click the delete option a delete glossary dialog box will open and click ok if you want to delete the Glossary.
Target Segments
The target segments tab demonstrates how the target market has been divided, the associated channel, its sources and finally the size of the target segment.
A Duplicates segment is included within the segment list to define the anticipated number of duplicate contacts within the segments. If duplicates exist, then the value entered to this segment is a negative number. The Campaign Funnel Report aggregates the target segments and uses the final result as the Targets (TAM) value in the Campaign Funnel.
The segments defined in the Target Segments tab are used within the Cost Per Lead tab.
Adding a Target Segment Item
A New Target segment item can be added by Clicking the "New Item" button in the top right corner, this will display a dialog box with 5 fields:
- Name (Mandatory) - The name of the new target segment
- Channel (Mandatory) - The marketing channel associated to the segment
- Source (Mandatory) - Where the target segment contacts are sourced
- Detailed Definition (Mandatory) - A description of the target segment
- Count (Mandatory) - The number of contacts targeted within the segment
Once all the fields are populated, click "Save" to add the segment to the Target Segment list.
Campaign Detail
Editing an Existing Target Segment
Existing target segments can be edited by clicking on the three dots on the row, this will display either Edit or Delete. Click Edit and a dialog box with the same fields from the New Item dialog box.
Make your amends and "Save".
Deleting Target Segments
A target segment can be deleted by clicking the three dots on the right hand side of each item row and clicking "Delete". This is a soft delete. So if you delete an item in error, it can restored in the database. Submit a request to support if you need this action to be taken.
Cost Per Lead
The Cost Per Lead tab is used for Content Syndication campaigns to determine the cost for the lead (source type for imported data = ContentSyndication).
Every content syndication inquiry in WMS has an "Agency Placement Name", this value must pair with an "Agency Placement Name" configured in the Cost Per Lead tab where a client price per lead and a publisher price per lead has has been set. The client price per lead is used in the Campaign Funnel Report for the cost of Content Syndication campaigns.
Creating a New Item
To create a new agency placement name, click the "New Item" button in the top right corner, a dialog box will appear with 11 fields:
- Agency Placement Name - This value acts as a key value to join the Cost Per Lead data in the funnel configuration to the Inquiry Process in WMS. It's important this value is entered correctly, otherwise the Cost Per Lead values will not be attributed to leads in the Power BI Reports
- Booked Placement Start Date - The date booked for the publisher to start supply of Inquiries
- Actual Placement Start Date - The date the publisher actually started providing Inquiries
- Booked End Date - The booked date for the publisher to fulfil their leads ordered target
- Clients Price Per Lead - The price the client pays for each lead
- Publishers Charge Per Lead - The amount paid to the publisher for each lead
- Publisher - Entity responsible for delivering Inquiries for the configured Agency Placement Name. This is a list of publishers setup on the web platform
- VPO Number - The Vendor Purchase Order (VPO) number assigned to the submitted VPO when the leads were ordered from the Publisher
- Total Leads Ordered - The amount of leads ordered for the Agency Placement Name
- Client Placement Name - The Placement Name assigned by the client (this field is no longer used in the Publisher Reports)
- Segment - The targeted market for the leads ordered from the publisher. This is a list of Target Segments configured within the Segments Tab
Data Sources
Add default data sources button is enabled, the Sync all data sources button is disabled, clear all data source button is disabled.
Actions you can take (Data Source):
- Search- you can search for the data sources
- Refresh-you can refresh the data source
- Adding default data source when you click Add default data source
- Rates dialog box opens select the sync time and enter the platform campaign ID click ok and the rates is added.
Dashboards
Displays all dashboards that were added as templates during campaign details setup.
- Actions you can take (Dashboard):
In the far-right collapsible menu, select Dashboard. A grid will appear displaying the following columns: Dashboard Name, Status, and Last Updated. The dashboard created for the campaign will be visible in this list. - To add a new dashboard, click Add on the far right. The Add Template Dashboard dialog box will open. Click the dropdown arrow, search for the template you want to add, and the matching results will appear. Select your desired template and click OK The new dashboard will then be added.
- Click Sync Campaign Dashboard to refresh and sync the dashboard. Then, click the dashboard in the list to open it. The dashboard will load in a new tab.
Budget
Funds set aside to run a campaign, the Account manager who has the Client is responsible for gathering the budget information and letting us what values to input in budget Client.
Actions you can take (Budget):
- In your far right there is Sync Campaign budget button, you press this button and the campaign budget information sync.
- A list of Regions and Source types will display and you can type in the budget per source type:
- Content Syndication – Promoting your content on third-party websites. Users download the content by completing a form, which converts them into leads.
- Paid Media – Running ads on platforms such as LinkedIn or Google. When a user clicks the ad and fills out a form, it triggers an inquiry in the WBL process, and a team member follows up.
- Calling – Proactively making outbound calls to potential prospects to generate leads, which then enter our process and are logged as targets, when you click save all the typed in values will be saved.
Campaign Budgert